Cutting scrapbooking titles by hand
It may sound a bit weird, but I actually enjoy cutting the odd title or letter, by hand! That doesn’t stop me planning on investing on a Craft Robo however! LOL!
 Knives
I have already mentioned, in a previous post Essential Tools for Scrapbooking Part 2, that I use a scalpel, and that the reason for this is I find it easier to grip and (like holding a pen) and the point of the blade is more like the nib of a pen to me.
So I find cutting an intricate title much easier with this tool. But of course it is what you are used to – I have been using the same scalpel (with replacement blades of course, LOL!) for nigh on 18 years!
Cutting TIPS
Because of the nature of a title, ie, there are lots of twists and turns to cut, there are a couple of things that make cutting a lot easier.
 First – don’t place your work on a normal cutting mat! Use a glass cutting board. I use the back of a glass kitchen chopping board. The front is textured and so useless, but the back does just fine.
Second – Turn the paper as you cut. Your knife should basically stay in the same position, moving only slightly, and your other hand should be moving the paper or card around, so make sure your work surface is clear of obstructions – especially if you are cutting from a 12x12 sheet.
There are various ways of placing your cutting outline onto the paper or cardstock:
1. print out the text and trace onto the card stock using carbon paper, if you can reverse the text before printing, so much the better.
2. freehand draw
3. if it will go through your printer then, obviously, print directly on to the paper, again if you can reverse the text then print onto the back side of your chosen paper.
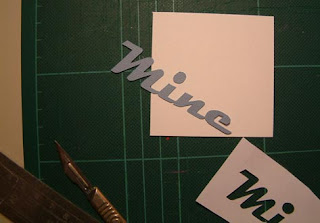
4. My quicker way (but possibly more difficult for cutting) is to just print the title onto ordinary white paper, tape it to the cardstock and cut through that and the cardstock. As you are going through 2 layers, you definitely need a sharp blade!
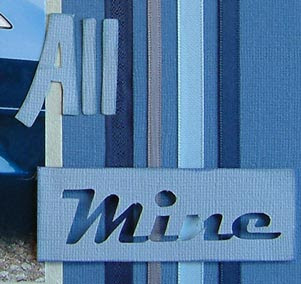
Useful TIP: I don’t like my hard work to go to waste, so when I am cutting out letters and titles I like to place them on the paper/cardstock with a decent margin around them. This means that if I cut really carefully, I get the use of the positive and the negative image. And I keep the unused one for another layout. If it’s the wrong colour, I can just recolour it!
 Knives
I have already mentioned, in a previous post Essential Tools for Scrapbooking Part 2, that I use a scalpel, and that the reason for this is I find it easier to grip and (like holding a pen) and the point of the blade is more like the nib of a pen to me.
So I find cutting an intricate title much easier with this tool. But of course it is what you are used to – I have been using the same scalpel (with replacement blades of course, LOL!) for nigh on 18 years!
Cutting TIPS
Because of the nature of a title, ie, there are lots of twists and turns to cut, there are a couple of things that make cutting a lot easier.
 First – don’t place your work on a normal cutting mat! Use a glass cutting board. I use the back of a glass kitchen chopping board. The front is textured and so useless, but the back does just fine.
Second – Turn the paper as you cut. Your knife should basically stay in the same position, moving only slightly, and your other hand should be moving the paper or card around, so make sure your work surface is clear of obstructions – especially if you are cutting from a 12x12 sheet.
There are various ways of placing your cutting outline onto the paper or cardstock:
1. print out the text and trace onto the card stock using carbon paper, if you can reverse the text before printing, so much the better.
2. freehand draw
3. if it will go through your printer then, obviously, print directly on to the paper, again if
 you can reverse the text then print onto the back side of your chosen paper.
4. My quicker way (but possibly more difficult for cutting) is to just print the title onto ordinary white paper, tape it to the cardstock and cut through that and the cardstock. As you are going through 2 layers, you definitely need a sharp blade!
Useful TIP: I don’t like my hard work to go to waste, so when I am cutting out letters and titles I like to place them on the paper/cardstock with a decent margin around them. This means that if I cut really carefully, I get the use of the positive and the negative image. And I keep the unused one for another layout. If it’s the wrong colour, I can just recolour it!


No comments:
Post a Comment