Showing posts with label tips. Show all posts

Saturday, April 24, 2010

Journaling Tip 1 and More Tearooms Snippets

Sunday's Weekly Round-Up - 25th April 2010
Hello there, I have been away from here for a while haven't I? Well those of you clicking through to my other website(s) will probably have seen all the goings on with the The Tally Ho Tearooms.
I have been living, eating and breathing the place for the last 4 months and this last month we have been working our little tails off! I am happy to say that we have been very busy serving lots of lovely customers full of compliments for the Tearooms... the decor, food, uniforms, service, etc.

Many cusomters have been been back a number of times already and we have only been open 3 weeks! The record so far (I think) is a lady who has been back 5 times, bringing a different person with her each time! A big thank you to all those who've been to see us and enjoyed their visit.

As for scrapbooking, well we held our first ScrapBuddies crop in the Tearooms on 13th and we have our first Open crop this coming Tuesday, for which I should be preparing a demo!

Because of the non-scrapbooking stuff going on in my life at the moment, I haven't written many articles and so the next Newsletter will be an April/May issue!

I did manage to get the freebie download out though, which was some free printable background papers (pictured). If you sign up to the newsletter, you get instant access to all previous freebies.

I have also managed to write the first of some quick journaling tips.


So here are some links... some scrapping, some tearoom, all possibly of interest?


Scrapbooking

Journaling Technique Number 1 - Keep it Basic


Links to interesting articles on other people's sites

Nice Layout by Scrapperlicious


Nice bit of layering (of stamped images)


Tearooms related

The Tally Ho Tearooms - Official Teapot sign!!

A Wow Week at the Tearooms

Oh My Word!

Sunday, June 28, 2009

Double Page Layout Scrapbooking Tips, Freebie Hybrid Papers and Apples!!

Sunday's Weekly Round-Up 28th June 2009

We have had some lovely weather this week, I have been outside, but as it's difficult to see my Laptop screen outside I have to be indoors for all that stuff, and then there's scrapbooking itself... you can't take it outside, especially if there is a breeze!

So actually I have spent a lot of it indoors one way or another! A few years ago (before scrapbooking) I used to spend most of waking hours in the garden... hardly do anything now, but then I have about a 10th of the size garden now!

Anyway, here are the articles over on the SundayLDesigns blog

Two papers for a Double Page Layout and a Title-on-Picture Tip
A recent Double Page Layout made from only two 12x12 patterned papers and how I managed that one, plus an explanation of the unusual title block on the right hand page... (not pictured here!) Read More>>


*************************************************************************

Making a Masked Page Accent Area on a Scrapbook Page
Following on from the article showing the techniques used on the right hand scrapbooking page of the “Arrrrrhhh” double page layout, I thought I would share with you how I made the Page Accent Area on the left hand page...

Read More>>

**************************************************************


Hybrid Background Papers Subscriber Freebie
I uploaded some brand new Hybrid Scrapbooking Papers last night! And if you are a Subscriber to my Newsletter, then you will have received an email with a link to a page which has some instantly downloadable papers! Look at these…

Read More>>

******************************************************


Peeled in One
I bought some pink apples for my daughter recently, in an attempt to make fruit more appealing to her! The type of apple is called “Pink Lady” and the batch we have at the moment are really shiny and lovely to look at...

Read More>>

Sunday, June 07, 2009

Scrapbooking Video, Podcast and 300 year old letters!

Sunday's Weekly Round-up 7th June 09

I have definitely been going all "multi media" this past week! On Tuesday I uploaded my very first podcast to the SundayLDesigns blog. It's about the Scrapbooking Page below and there are some tips about scrapbooking without photographs and making economical use of double sided paper. Read More>>


I have also uploaded a short video showing you some very old (300 years old) letters which I have scanned in for use in my latest collection of Hybrid Scrapbooking Papers pictured below.


Here is a preview of a set of 12 8x8 background papers for Hybrid Scrapbooking. The collection is called "Colourful Beauty by SundayL" and will be available soon on ICanCraftNow.com.


As for other things...

Here is a fantastic layout by Irene Tan aka Scrapperlicious. It's simply titled "U". I love the way Irene gives so much attention to detail in her layouts. She has a distinctive style which creates interest on many levels. You can see this in the close up pictures she includes on her blog with details of how she achieved the look too. Check out her blog post>>

Sunday, May 10, 2009

Video - How to easily Store your stickers, rub-ons, chipboard, diecuts in one place

I wrote this article (and made the video) for a past issue of the SimplyScrapbookingNow.com Newsletter. I reproduce it here for you as I was reminded of the subject again recently when someone asked me... "How do you store all your sheets of stickers, etc?"...


I am often asked about how I store all my packets of stash such as stickers and diecuts and rub-ons, etc. Many scrapbookers have all sorts of packets in all sorts of places and find it difficult to keep them all organised.

Well I keep all mine in Lever Arch folders!


These folders are for keeping all my sheets of stickers, etc, the more bulky items such as very thick chipboard still remain in their packaging boxes, but this system is ideal for all those flat, but differently shaped and sized sheets.

The items are filed in different sections within each folder, ie, (1) Alphas and (2) Words and Phrases are in the Pink folder shown above and (3) Graphics are in the multi-coloured folder.

Within each folder I have placed ordinary clear sleeves with standard punched hole margins, and within each of the sleeves I have placed a white piece of paper.


The reason for adding the paper is two-fold, firstly it makes the sleeves a little more rigid and secondly, I can put twice as much in my folder because I can place separate items either side of the paper within the same sleeve because it is no longer completely transparent.

Another advantage is that often your stickers or rub-ons are attached to a transparent sheet and with the paper already in the sleeve you can 'ditch' the piece of card and cellophane wrapper to save on weight, as the white paper does the same job or showing up the contents.

It is very easy to flip through the pages looking for what you need for your scrapbooking project.


The folders are highly portable, unlike the hanging trees and poles for your craft room, so you can take your sheets of stickers, etc to crops with you, kept all in one album/folder.


The reason I use Lever Arch files as opposed to ordinary ring binders is because they are nice and wide and therefore take a lot more, they stand up easily by themselves on my crafting shelves, but the best part is that with the clip retainer on lever arch folders you can clip down the sleeves tightly so that they don't fall about all over the place!


So that's how I store my bits and pieces!

Sunday, May 03, 2009

Video Tip for printing your photographs for scrapbooking by Sunday L

Here is a short (2 minutes) video explaining a quick tip about printing your photographs so that you can get some scrapbooking done! Stop Worrying so much about quality and just get scrapbooking!

Sunday, March 22, 2009

Scrapbooking Video - How to create more space on your page and hinge a photo

Here is a video from the SimplyScrapbookingNow.com site. It's about how to get more photographs on your page and yet it still looks like a one photo "arty" page.

You know the sort I mean, those pages you would like to make which have one photograph and lots of lovely papers and embellishments to set it off. The only problem is that it doesn't make a dent in your "photo mountain" and you need to scrapbook more photos. Also other photographs are necessary in your scrapbooking pages to tell the story correctly.

So here is one solution to that problem.


Sunday, March 15, 2009

Another "Tips Video" on photo cropping & Easily Made Favours Bag

Hello, We had a great afternoon at the ScrapBuddies Crop yesterday! (where we do Scrabooking and Cardmaking and, well, just about any papercrafting to be honest!) My demonstration was about "how to make a 2-5-7-10 bag".

I decided, as the bag is sooooo easy to make, that rather than me demo it and then members make it, we all worked along together (those that wanted to join in that is - as ScrapBuddies is a very relaxed group and you can join in if you wish or just carry on with your own projects!)


Above are some examples of some of the members' completed projects which they managed in no time at all. I did hand out a free template for everyone, (I always provide a free hand-out at the crops).

Next time I will be demonstrating Hybrid Crafting, and there will be a free kit available for anyone attending, but make sure you email me befre 6th April so that I can send you a link for the download that you can print out and bring with you.

As for other things, the ICanCraftNow.com website is almost up and running, and the free hybrid card kit will be available for all very soon! I'm just putting the final touches to the matching items which will be available to purchase such as a matching envelope, tag, scrapbooking papers, and a brag book and mini bag which will come along a little later. I'm also not going to make you all wait till I have my shopping cart installed either, that will come later, so buy now buttons will be available. I'm getting really excited about it all now!

Right then, I have another video for you... and don't forget that there are more posted every month in the SimplyScrapbookingNow.com Newsletter, sign up and you'll get them first!

This video is about Photo Cropping Tips for Scrapbook Pages


I hope you find the video useful!

Friday, January 23, 2009

Scrapbooking Tip - Using Rub-ons that won't work properly

Hello! I have been filming a couple of videos today. They are for the February issue of the Newsletter. I also cleared and cleaned most of the house this afternoon, which is only noteworthy because (as my husband would be quick to agree!) I don't "do" housework very often! LOL

Anyway, here is another page I finally managed to finish... one that had been "Half done" for some time! Let me give you a tip... the title to this page shows an example of this tip.

Finished Page
The child's face has been masked at the request of the parents.

You will notice that the letters to the title appear to be printed on acrylic (or similar). Well they are actually rub-ons which I have cut out from their backing. Why have I done this? ... you may well ask. Well basically because I bought these rub-ons from a bargain bin in a local craft/scrapbooking shop and found that no matter how hard I rubbed, there was no "on" going on!

I think as they were old stock (I presume, hence the discount) they had actually dried out too much and didn't want to come off the backing sheet.

So, my tip is that if you have some rub-ons that... frankly, won't "rub-on" then stop rubbing and start cutting. Just cut out each of the letters you wish to use (this is for the bigger sizes of alphabet and for words and quotes really) and adhere them to your project. I have left my cutting "rough" as I wanted that effect, but I could have trimmed in tight to the edge of the letters.

I have used the glue from a glue pen on the back of each letter, but for such things as quotes, you could easily make use of the backing by way of using brads or eyelets etc.

Wednesday, October 22, 2008

Scrapbooking Inspiration - keeping notes

Here's a little one of my tips!

When I am surfing for Scrapbooking Layout Inspiration I make notes to remind of things I have seen, for later use... nothing new there!

However, when I am in my internet browser, I have my word processor package (Microsoft Word, in my case) running in the background.

When I see a layout I like, I copy the picture and paste it into my open page in Word. I then copy the address bar (the address of the exact page, not just the domain name) and paste that into my document too.

In Word, the links are "clickable" and I can get straight back to the right page directly from the open document.

I make notes, copy and paste text, etc... and I then save the document and can refer back to it later.

This is great for keeping sketches, layouts for scraplifting, etc because you have the information linked so that you can refer to the internet pages to make sure you give the correct credits... especially in my case with publishing on my blog here.

I often place these documents directly onto my "desktop" for easy access. When I have used the information, I simply delete the file! Of course you can print out these pages, but I mainly use this system for the ease of clickable links with which I can write some of my own notes.

Tuesday, September 16, 2008

Scrapbooking Video - "Tips for using double sided tape"

Here is another video I made... just a quick one!

It's a tip about "not using scissors with your double sided tape" - which is a tip that I give to a lot of people, especially at my beginners workshops, and especially if the newbies are borrowing my scissors!! LOL


Monday, September 08, 2008

Stretching your paper to fit a Scrapbook page

Yesterday I mentioned I would show you the back of the layout I had just posted.

A little reminder of the page here>>>>

And that's only basically because the back of the scrapbooking page layout is interesting... but not very aesthetically pleasing! LOL

Anyway, I made mention that I had "stretched" 6x6 paper to make an 8x8 layout.


Well as you can see from the back, I cut a small corner of the pink paper and placed it at the opposite corner underneath the paint swatch cards, to make it look like a full 8x8.

Also the Blue patterned paper was placed on top of the bottom half of the pink paper (layered) so as to make up the 8x8 in that area.

So you can easily see that you don't have to have the correct size (or bigger) paper to create a background.

I will probably place this layout onto a backing paper... just to tidy up and make the whole scrapbooking page feel a little more rigid!

Thursday, July 03, 2008

A quick way to darken text on a scrapbook layout

This is a close up of the hybrid page I made recently - see Monday's post.

It's to show the word "Deep". As you will notice, it is shiny!

I thought that in the printed copy of the digital page the black words did not have enough contrast so I used some 3-D Gloss over the top to just lift the letters and give more definition.

I used a thick needle to "paint" the gloss onto the thin image.

It's a quick and easy way to Darken any printed graphic or text.

Wednesday, July 02, 2008

What is "gutting" in Scrapbooking terms?

When the term "gutting" is used by us scrapbookers, you know we are not referring to fish... right?!!!

Of course not! What it refers to is the fact that you are "gutting" a piece of card or paper by taking the middle out of it.

Why would you want to do this...?

Well it's a means of economics really. If you "gut" the mat of a photograph or, in the case of the one in the photos here, a whole layout... you get to use the bit in the middle for something else. It makes your stash "go" further.

It would be a waste to leave almost a whole sheet of card which isn't going to be seen.

The reason I wanted to mat the layout here, was because it is a digital A4 layout that I printed out and, of course, my A4 printer can't quite print up to the edge of a whole piece of A4, so there were margins.

I wanted to make the layout up to a proper A4 size and so matted it.

However, before adhering it to the page I used my steel rule and scalpel to gut the card first and now have almost a whole sheet of A4 to use for something else too!

P.S. If you are wondering why I haven't shown you the front of this scrapbooking page, it's because I am submitting it to a magazine for possible publication and so can't publish it here until I know whether it will be published or not! But will as soon as possible.

Tuesday, July 01, 2008

Keeping your ribbons in place

I, like a lot of people, like to put ribbons and fibres on the book rings of my projects.

Pictured is a paper bag book album.

Some ribbons, such as rikrak and some of the cheaper ribbons are happy to be tied once and stay put on the rings. Others, however, (the better quality, double sided ones) quite often untie themselves.

I had to re-tie a number of ribbons which had fallen off on a recent Circle Journal!

So, some tips for keeping the ribbons, etc, where you put them...

1. Try knotting the ribbon twice, sometimes this is all that's needed.

2. Once you have tied the ribbon, you can use a bit of pvc glue "inside" the knot, using a clip of some sort to hold it place whilst it dries. The thin precision nozzles on a number of crafters pvc glue bottles makes this easy.

3. Tie the ribbon once and then use a brad to hold it. Can make for nice decoration if you use a contrasting colour.

Happy tying!! again

Monday, June 09, 2008

A trick for handwritten journaling

Here is a tip for getting large handwriting onto your layouts.

If, like me, your natural handwriting style is to scribe with quite large letters, try writing onto a larger piece of paper - placing some lined guides underneath to help - and write in your normal style.

When you are finished, make a photocopy of your journaling and reduce it's size. Most 3-in-1 printers have this facility. Just use the program on your PC (the one which will have come with your printer) and reduce the size down.

In the photograph here, there is my original handwriting at the top and the photocopy at 50% reduction at the bottom. I have placed a pen in the picture to give you an idea of size.

Also, you can use this technique for printing your handwriting onto any coloured paper or card that you can fit through your printer. This is great if you are nervous of writing onto "good paper".

And... wait there's more!... you can use your scanner to scan in your handwritten piece and use the scan on a digital scrapbooking page!

Wednesday, June 04, 2008

Another EASY way to record your Stamps

Yesterday, I explained a way of recording what stamps you have in your stash by actually stamping the images.

Well here is another way of doing a similar thing.

Photocopy your stamps!

A lot of us have 3-in-one printers nowadays, and this technique is really only for those with easy access to a photocopier.

The photo here shows the actual stamps in their packaging on the right and the photocopied image on the left. It may have been worth taking them out of the cellophane wrapping to avoid the reflection, but by photocopying the packaging I will know what sort of packet I am looking for when I start to rummage!

Another point to remember about this way of doing things is that the stamps pictured have a printed acrylic sheet to which the stamps are stuck! The stamps themselves, being clear, don't photocopy that well! Used clear stamps with residue ink still on them can, however, provide a clear enough photocopied image.

But this is a good technique for the solid rubber unmounted stamps too, such as "See D's".

Tuesday, June 03, 2008

One EASY way to know what stamps you have!

How many stamps do you have? Do you know?

Can you remember what all your stamps look like?

Have they been tucked away somewhere and rarely see the light of day, so you have forgotten what you have?

Well, a solution to that little dilemma is to "Stamp your Stamps"!

Make a stamped image of all your stamps onto pieces of A4 (or 8.5 x 11") and then you can place the paper into a folder (or just clip them together) and keep that handy so that you can see quickly and easily what you have. Once you decide on the stamp(s) you want... then you can play "hunt the stamp" LOL.

If you have your stamps in difference places, ie, "box 1.", "box 2.", etc, you can easily write a note on the sheets of stamped paper about the whereabouts of each the stamps for ease of retrieval!

The stamped images do not have to be perfect, they are literally to give you an idea of what the image is and how big it is!

The photograph shows a some stamps (Anna Griffin) still on their background acrylic storage sheet. All I did was roughly ink up all 5 stamps at the same time and then just make a rough print. If I wanted to I could have filled the whole of the sheet of paper.

This is great for alphabets too... especially as you can see what the actual size is straight away and can "offer up" the printed sheets to a scrapbooking page-in-progress to check a stamp's suitability before the rummaging begins!

Sunday, April 13, 2008

A Scraps Page Accent

You may well have heard of the TIP that before you tidy away your bits and pieces after finishing a scrapbooking page layout (or any other project for that matter) you should use some of the scraps to make a card or two!


Well, you don't have to make a card! You can, as in the picture, make a page accent! This can be used on a future page or use the page accent as the basis for a card!

The accent in the picture... I will probably use it on a card (or a page) for a man - despite the pink bits!

Sunday, March 30, 2008

Using up your stash leftovers

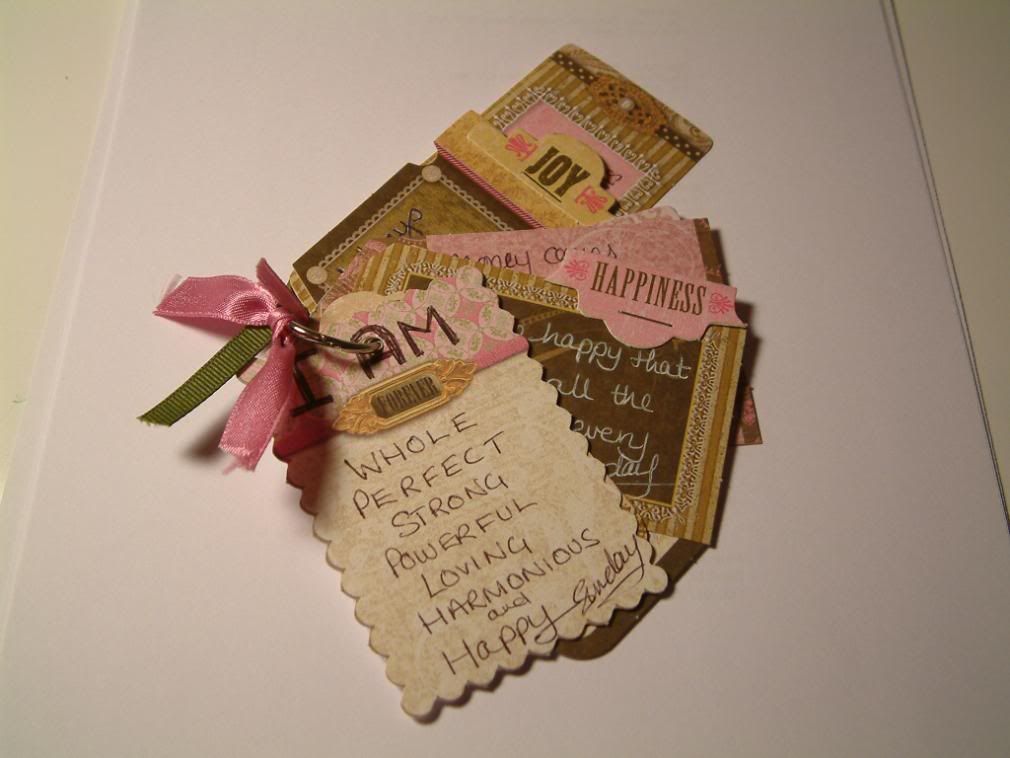
This is a picture of a little tag book I made - very quickly.


The tags are actually die cut tags from K&Co "Scrap Pad to Go".

Often, when you buy a kit or pack like this you end up with items that you just wouldn't use, mainly because they are not your style.

That was so with all the die cut items that came in the scrap pad.
On each tag there is an affirmation... personal to me, of course (and to do with "The Secret" about which I have mentioned in previous posts).
So to quickly make a little booklet of my affirmations, (rather than just wrtite them on a piece of paper) I decided to "use up" some of the tags in the pack, along with some of the bits and pieces, such as the tabs that say things like happiness and joy (but were in the sorts of colour combinations I wouldn't think to use on a layout.
Anyway, of course you could just add a photo to these tags, or just inspirational quotes... put a book ring through their holes and add a couple of bits of ribbon and hey presto you're done! Use for your self or give it as a gift.
If you make a couple up with quotes (ie nothing specific to one particular person) you could have some of these little tag books "on standby" ready for use as emergency pressies!!

Saturday, February 23, 2008

Keep a Notebook for your Scrapbook

By notebook, I do actually mean the old fashioned little notebook made of paper and not the fancy pants laptop technology that is available today! LOL


I have mentioned this TIP before, but some things are worth reiterating - it is a really useful habit to keep a notebook handy at all times to scribble down those little conversations one has some days (usually noteworthy ones with children) which you can scrap at a later date.

These are great for those pages with either no photo, or a photo you really want to use (of the person(s) in the conversation) but have nothing specific to use it for.

Your notebook need be nothing more than a "value" notebook bought in packs of 5 at your local supermarket, it's just a piece of paper when you need one (and of course carry some sort of pen). Both of these I carry in my handbag at all times, along with various other things like a veritable pharmacy and a nappy bag and a spare pair of my daughter's knickers! The things we keep in our handbags, eh!!!

Something my daughter said recently I wrote down...

I asked her what she was doing and she said..."I brushing Harley, because he's melting"!

Anyway, the pic here is just an up to date picture of Inde, who is now just over 6 months old and training up well!