
Why we should Scrapbook ourselves! – Part 2

Scrapbooking Layouts – A Very Personal Journey
Carrying on from Part 1 about actually trying to take a decent picture of ourselves, I thought I’d mention the printing of such photos!
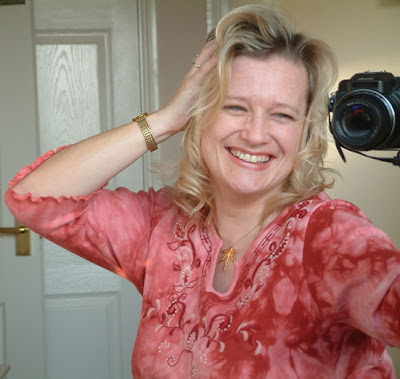
Having finally got around to taking some photos of myself in the mirror, I then started to feel a little self-conscious about having them printed by someone else! Well you know… I felt they would think me vain! In truth, why should they be bothered. But, and this is more important, I shouldn’t let myself be bothered about what others may, or may not think of me… something with which scrapbooking is helping me (more about that in another post).
Anyway, initially I thought I could print these self portrait photos out myself of course, but my printer at the time wasn’t really up to the job! So I ended up taking a disc of the photos down to my local shop where there was a Kodak Instant Processing Booth. It was here that I printed my first self portrait pictures and those are the ones you can see on the layouts in my first post on this subject.
I found I could print them out at the booth in relative privacy, and the quality was good, certainly a lot better than my printer at the time.
After creating my first self portrait page “It’s My Life” I gained a little more courage to actually get some more photographs printed by a photolab and was pleased with the results.
 You may well be feeling a similar sense of self-consciousness about taking pictures of yourself… but I assure you, it is possible to shoot and print them in relative privacy, even if you don’t print them at home.
By the way… a little tip for those of you struggling a bit with how to print your photos.
I was having a conversation about this with my mum. She was struggling to use the program which came with her camera to view and print her photos. She had managed to print a couple, but they were large and printed right in the middle of an A4 sheet of photo paper (which isn’t particularly cheap) and of course it wasted all the white space around the edges.
Now… there are packages out there for fiddling with and printing photographs, but for a large percentage of home users… all they want to do it print the picture (or pictures) onto a piece of paper.
So here is my tip for successfully printing one or more photos onto a sheet of A4 paper, to get the most value for money out of your sheet.
Use your word processor.
I use “Microsoft Word” and my Mum uses “Lotus”. But most word processing packages are very similar. This is what I do.
In Word, I bring up a blank sheet of paper and reduce the margins just enough so that they are within the printer’s range. I take them down to about 4mm top, left and right and about 7mm at the bottom.
I then insert the first photograph I want into the “piece of paper” on the screen. It always brings the picture in full width (so it may initially take up the whole page) but all I do is click on a corner of the picture and drag it towards the middle to reduce it’s size. Now I can use the crop tool to trim it how I want it, and I can also adjust the contrast and brightness too. I also have the facility to change the image to black and white.
I use this method of printing for most of my photos. It is especially good for printing a load of photos for a mini album or something like an exploding box. I can manage about 12-15 pictures of approximately 5cm square (2”) on one A4 sheet and there is very little wasted paper!
If you want to have an exact measurement for your photos, ie all the photos cannot exceed 5cm width because the exploding box pages are only 5½ to 6cm wide anyway, you can go into “properties” for each photo and specify the height or width and, hey presto, the other measurement is automatically calculated for you.
Just click to the side of the picture to insert another picture beside it and so on.
So … now you can photograph yourself and… you can print lots of them using your printer… but the great part about printing them at home is that (also in Word) you can “flip” the images so that the photographs are no longer mirror images. Particularly important if you cut out the camera from the shot!
If you print using a photolab… unless you have fiddled with each photo to flip them before saving them onto a disc, you will end up with mirror images (of course!). All ok, but that’s not how others see you.
Carrying on from Part 1 about actually trying to take a decent picture of ourselves, I thought I’d mention the printing of such photos!
Having finally got around to taking some photos of myself in the mirror, I then started to feel a little self-conscious about having them printed by someone else! Well you know… I felt they would think me vain! In truth, why should they be bothered. But, and this is more important, I shouldn’t let myself be bothered about what others may, or may not think of me… something with which scrapbooking is helping me (more about that in another post).
Anyway, initially I thought I could print these self portrait photos out myself of course, but my printer at the time wasn’t really up to the job! So I ended up taking a disc of the photos down to my local shop where there was a Kodak Instant Processing Booth. It was here that I printed my first self portrait pictures and those are the ones you can see on the layouts in my first post on this subject.
I found I could print them out at the booth in relative privacy, and the quality was good, certainly a lot better than my printer at the time.
After creating my first self portrait page “It’s My Life” I gained a little more courage to actually get some more photographs printed by a photolab and was pleased with the results.
 You may well be feeling a similar sense of self-consciousness about taking pictures of yourself… but I assure you, it is possible to shoot and print them in relative privacy, even if you don’t print them at home.
By the way… a little tip for those of you struggling a bit with how to print your photos.
I was having a conversation about this with my mum. She was struggling to use the program which came with her camera to view and print her photos. She had managed to print a couple, but they were large and printed right in the middle of an A4 sheet of photo paper (which isn’t particularly cheap) and of course it wasted all the white space around the edges.
Now… there are packages out there for fiddling with and printing photographs, but for a large percentage of home users… all they want to do it print the picture (or pictures) onto a piece of paper.
So here is my tip for successfully printing one or more photos onto a sheet of A4 paper, to get the most value for money out of your sheet.
Use your word processor.
I use “Microsoft Word” and my Mum uses “Lotus”. But most word processing packages are very similar. This is what I do.
In Word, I bring up a blank sheet of paper and reduce the margins just enough so that they are within the printer’s range. I take them down to about 4mm top, left and right and about 7mm at the bottom.
I then insert the first photograph I want into the “piece of paper” on the screen. It always brings the picture in full width (so it may initially take up the whole page) but all I do is click on a corner of the picture and drag it towards the middle to reduce it’s size. Now I can use the crop tool to trim it how I want it, and I can also adjust the contrast and brightness too. I also have the facility to change the image to black and white.

I use this method of printing for most of my photos. It is especially good for printing a load of photos for a mini album or something like an exploding box. I can manage about 12-15 pictures of approximately 5cm square (2”) on one A4 sheet and there is very little wasted paper!
If you want to have an exact measurement for your photos, ie all the photos cannot exceed 5cm width because the exploding box pages are only 5½ to 6cm wide anyway, you can go into “properties” for each photo and specify the height or width and, hey presto, the other measurement is automatically calculated for you.
Just click to the side of the picture to insert another picture beside it and so on.
So … now you can photograph yourself and… you can print lots of them using your printer… but the great part about printing them at home is that (also in Word) you can “flip” the images so that the photographs are no longer mirror images. Particularly important if you cut out the camera from the shot!
If you print using a photolab… unless you have fiddled with each photo to flip them before saving them onto a disc, you will end up with mirror images (of course!). All ok, but that’s not how others see you.
"Interesting to see what others see..."
It’s actually quite interesting to see the flipped image of yourself… it’s not how you are used to seeing yourself in the mirror, but it is how other’s see you, and strangely it takes a little time to get used to it. No-one has a symmetrical face and I for one, have a side parting!!
 My profile picture on this blog, was achieved by doing the above. The slight difference is that I opened it in a photo imaging program to crop, reduce and flip it.
So… have I given you any more incentive to try self-portrait photos?
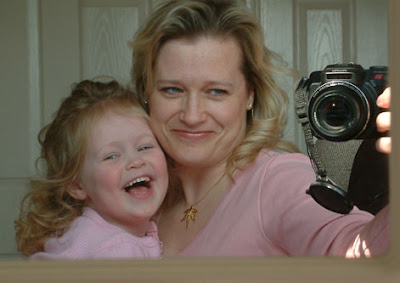
I have also achieved some nice shots of my daughter and I together using the “mirror technique!
Part 3 will be about how you can scrapbook yourself… now that you’ve taken some photos! LOL!
 My profile picture on this blog, was achieved by doing the above. The slight difference is that I opened it in a photo imaging program to crop, reduce and flip it.
So… have I given you any more incentive to try self-portrait photos?
I have also achieved some nice shots of my daughter and I together using the “mirror technique!
Part 3 will be about how you can scrapbook yourself… now that you’ve taken some photos! LOL!


1 comment:
Sigh. I am HORRIBLE at scrapping myself. But I'm trying. I like your tips on self portraits, because I just don't even think of doing it, and I'm the one in charge of the camera, LOL!
Post a Comment